Monday, November 22, 2010

Pages - Worksheets

One for Mac Users - The most underrated program on the Macs.

Pages is a wordprocessing application that also allows you to use layout and colour to produce professional looking documents. For teachers the best thing about Pages is that we never have to hand out another boring photocopy to our students again.

The easy thing about pages is the templates that come with the program. When you click on the Pages icon the template chooser  immediately opens. This gives you the opportunity to design how you would like your document to look. Use Pages as a wordprocessor or use it as a professional page layout tool.

Once you have chosen one of the layouts your document will open. Each of the design aspects on the layout is there only as a placeholder. This means that you can simply drag a new image or cut and paste new text into the format on the document. 

You can change the size of text box by dragging the arrows on the corners. 

You can change the size of your pictures or even change the amount of the picture you use by playing with the slide bar on the Edit Mask.

All of the colored shapes are added by clicking on the shapes icon in the toolbar. The colour of each shape can be changed by clicking on the small coloured box next to the Font Size box.

DESIGN HINTS:
Design hints are numerous, but there are some very simple rules you can follow when designing a worksheet or booklet. Like everything else these rules are meant to be broken. The more confident you get the more rules you should break.
  1. Three colours only per page. These three colours should come from any images you have used on the page.
  2. Repeat these colours throughout your design to help pull the design together.
  3. Balance your design. If you have a big heading, then a block of colour may be necessary elsewhere on the page.
  4. Include one (1) large image or if you want multiple images keep them the same size.
  5. Do not be afraid to include text of different sizes. Place different concepts in different coloured boxes.
  6. Stick to one font per document. There is nothing harder than trying to read different styles of fonts on the one page.
  7. Finally, in this age of digital information it is vitally important that our students see us doing the right thing. We should reference properly any material that we use that is not our own.
  8. Use your favourite magazine for design inspiration. Have FUN.


Tuesday, November 16, 2010

QR Codes


A QR Code is a matrix code readable by smartphones, iPods and iPads. The code consists of black modular pattern in the form of a square tile on a white background. The information that can be encoded includes text, URLs or even pictures. This makes them an excellent too to use with your students. Leave them clues, hints or suggestins in their worksheets of assignments. QR is an acronym for Quick Response, as the creators intended the code to allows ts contents to be decoded at high speed.

You can create your own QR codes with a QR Generator. Embed pictures, website links and even video in your own blogs or documents. This a fun way for students to decode information.


Tuesday, November 9, 2010

Sir Ken Robinson

This is an excellent argument for change in education. It highlights both the outmoded form of current education and the need for educational reform that pays more than lip service to differentiation, individualised learning and using technology to improve the depth of student learning. The animation is cute but the content of the talk is vital.


It is this intelligent questioning of pedagogy that must be the driving force behind educational reform. As always the technology is simply a tool that enables change. Technology without solid pedagogical reform is mere window dressing.

GeoTagging

Geo tagging is my favourite thing about Flickr. We are teaching a unit of work on Graffiti in Visual Arts at the moment. As part of our research we are photographically documenting local graffiti. These will be saved and then uploaded to our Flickr account.

We will geo-tag these images and then create an online exhibition. The students will work collaboratively to decide which images will be included and why and in what order the audience should view the images to see the historical progression of graffiti in Eastwood. Some piece have been in place for 7 to 8 years. People will then be able to access the images on a google map and actually find them if they want to view them in situ.

This is a mock-up only (We have yet to finalise our own)
This feature of Flickr could be adopted for any number of activities in various subjects areas.

Geography - local rivers, creeks, dams or land forms
History - famous battle sites, incidents in history, war memorials
Art - art galleries and museums, public sculptures, buildings of architectural importance
Religion - local Churches of world religions, incidents in the life of Jesus or the saints
Hospitality - cafes, food supplies, wholesalers, growers, organic farmers - Food Equity Unit

Documenting excursions or field trips takes on a new dimension when people back home can see where you went and what you experienced.


Monday, November 8, 2010

Flickr

I mentioned Multicolr in an earlier post but made the assumption that everyone knew what Flickr was and how it could be used in classrooms. Flickr is a Web 2 tool that allows you to manage your photographs and video online. This may mean creating albums, sharing with family and friends or even giving them the ability to organise your content - adding comments, tags or note. The app also allows you to create groups so that only invited people can access your photos. This makes Flickr perfect for schools. Create a group and invite students and parents to view portfolios of work, drawings, artworks, presentations, videos of role plays or even performances. Get the students into the habit of digitally documenting their work both process and product. This means that you also have evidence of outcomes and competencies. 


Many Flickr users have chosen to offer their work under a Creative Commons License, and you can browse or search through content under each of the types of licenses. This means that Flickr is a great place to find images to illustrate your handouts online worksheets or presentations. It also means that students can obtain images for their own presentations or assignment without breaching copyright.


Flickr also has the ability to Geo-Tag images. This means that images have the geographical location embedded into the digital information that is recorded with the image. You can locate where the image was taken on a google map or google satellite image.


Mosaickr

What do you do with the thousands of photographs you have taken on your recent holiday or shot of your students throughout the year. It is such a shame to let them go to waste. Mosaickr is an online mosaic maker. It is a tool that uses all of your images to create a larger image. I have seen companies charge $100s to do these. 


This Web 2 tool allows you to make your own. With the mosaic engine of "mosaickr.com" you can generate mosaics with up to 500 images and a total of approximately 2500 tiles. Make sure you first have a Flickr account.  Once you have your Yahoo!-ID and your Flickr account you are all set and ready to use "mosaickr.com" to create an unlimited number of photo mosaics. Your students will love to find the images of themselves in your class mosaic.


Scribblescreen

Since we introduced ScribbleMaps it is only fair that we have a look at ScribbleScreen for Macs.


ScribbleScreen is a presentation tool allowing you to write directly onto the screen, drawing the attention of the audience to items which can be in windows from completely separate applications, high-light items as you speak about them, sketch a quick diagram or type some text.

ScribbleScreen works by capturing an image of the screen at the moment it is launched; thereafter drawing occurs on top of this screen image as a background. This background can take over the whole screen (the other applications still running, but hidden) or can be in a smaller side window so you can see the other applications.


This is a great tool for teachers and students when presenting computer skills or a set of instructions on the screen that the class has to follow carefully. I love this, it is so simple!


ScribbleScreen is a freeware application for Mac OS X 10.3.x/10.4.


Only2Clicks

Only2Clicks is a visual bookmarking site. It lets you set up a customized home page with instant access to those sites that you use the most. This means that you have instant access to your bookmarks anywhere at any time that you have computer access. The name comes from the fact that (at the most) you’re only two clicks away from whatever websites you frequently visit. It is good for those people who spend the majority of their web time in the same couple of websites. You can set this as your homepage so that at any time you are literally Only2Clicks away from your favourite sites.


Scribblemaps

Scribblemaps lets you scribble over the top of google maps or google satellite images. This is excellent for teaching students about mapping, following routes or even working out co-ordinates on a map. This could be used in Maths, Geography, History, documenting Field Trips or even Art. This is easy to use and doesn't even require a login if you don't want to.


Combine this tool with Jing (see previous post) to cut and paste screen shots of the maps that you have annotated, or print out a specific routes travelled on a journey to include in assignments. Good simple Web 2 tool that is easy to combine with other tools for students to further enhance understanding.


URL Shorteners


Ever been sent a link in an email that is so long it is broken up being sent. You have to spend time cutting and pasting it back to together only to find out it still doesn't work. You try typing it in yourself to see if you can spot the mistake but again nothing.

URL shorteners take a very long link and create a redirect. You create a short URL to take the place of your huge one.


Turn this URL:
http://www.amazon.com/Kindle-Wireless-Reading-Display-Globa lly/dp/B003FSUDM4/ref=amb_link_353259562_2?pf_rd_m=ATVPDKIK X0DER&pf_rd_s=center-10&pf_rd_r=11EYKTN682A79T370AM3&pf_rd_ t=201&pf_rd_p=1270985982&pf_rd_i=B002Y27P3M
into this TinyURL:
http://tinyurl.com/KindleWireless
This is also important if young students have to re-type the Website address - short URLs make for significantly less mistakes.


Sunday, November 7, 2010

Andrew Churches

Most of the information on the Bloom's Digital Taxonomy post was gleamed from Andrew Churches Wiki. For a detailed analysis of Bloom's Digital Taxonomy check out his wikispaces site. Not only has he given explanations of Blooms Elements of Learning but he provides examples of the types of tools that teachers could use whilst implementing digital technologies.


Andrew's Educational Philosophy:
The world is not as simple as saying teachers are digital immigrants and students digital natives. We have to change how we teach, how we assess, what we teach, when we teach it, where we are teaching it, who we are teaching and with what. Its a tall order, but these are exciting times. This is not just about the integration of technology into the classroom, though this is certainly a critical area. It is about shifting the entire paradigm of education.


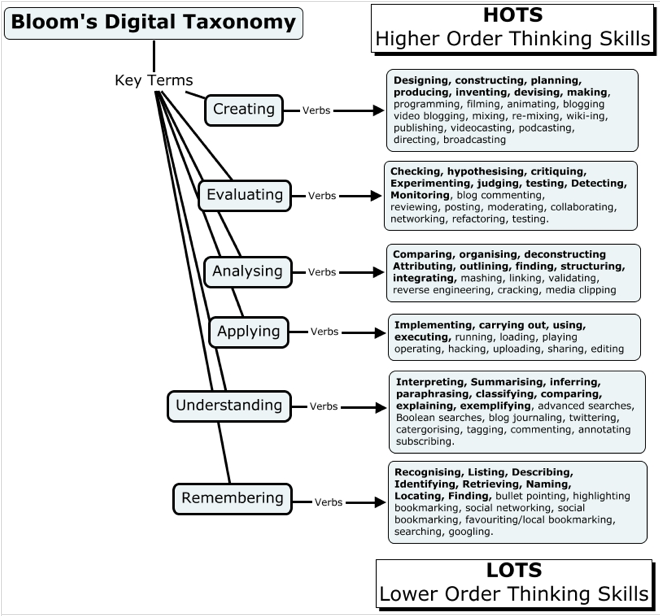
Bloom's Digital Taxonomy

Bloom's Taxonomy has been a cornerstone on which we have based our teaching practice. For many teachers it was the starting place when writing a task or even a unit of work. Unfortunately his Taxonomy does not take into account computers in schools or 1-to-1 laptops programs. 


In the 1990's, a former student of Bloom, Lorin Anderson and David Krathwohl, revised Bloom's Taxonomy and published Bloom's Revised Taxonomy in 2001. The major difference is the use of verbs rather than nouns for each of the categories and a rearrangement of the sequence within the taxonomy. 


This update to Bloom's Revised Taxonomy attempts to account for the new learning models emerging as technology advances and becomes more prevalent. Bloom's Revised Taxonomy describes many traditional classroom practices, behaviours and actions, but it also adds new processes and actions associated with Web 2.0 technologies. Bloom's Digital Taxonomy isn't about the tools or technologies rather it is about using these to facilitate learning. 


Bloom's Digital Taxonomy is the new go to document when designing activities. This list is the the Web 2.0 bible of activities. Use this as a starting point to get into Web 2 tools or use as a reminder of the other tools that your students could also be using.


Remember - the individual tools are irrelevant it is the processes and then the deeper learning that occurs with the use of some of these tools.


From Andrew Churches Website - http://edorigami.wikispaces.com/.

Saturday, November 6, 2010

Block Posters

Make a huge poster out of any image you like. It is as simple as selecting your image, uploading to the Web 2 tool, deciding how it gets split and then downloading it again. The tool slices the image into the correct number of individual pages so you just hit print and each one is printed ready to be lined up on the wall.  Presto - huge poster.

This would be great for stimulus materials for new units of work, printing scenes for role plays or small theatre productions, you could also scan and then print out artworks at their original size so the students get an idea of the impact of the original. So many great uses for this tool.


SFMOMA

This is the collection of the San Francisco Museum of Modern Art - all on one page. Click on and drag the looking glass over the images, if one takes your fancy click on it to zoom in. This is a beautiful way of viewing the collection. There are many famous works or works from famous artists but some of the most poignant works are from unknown artists.


Big Huge Labs

This is a huge suite of Web 2 tools. 43 really great tools in one to be exact. You can easily make jigsaws, posters, pop art, photo booths, mosaics, photo albums, calendars, bead art and even photo cubes. This would keep a class busy for a whole year. Every event or activity is covered here. This is a fantastic resource for any teacher.


These tools are simple in their construction but big on effect. Many are simple drag and drop tools where you select the images or photographs you wish to use and drop them in the boxes provided. The real wizardry happens in the background but your students, family or friends get the wow factor. I love the professional quality of the products in this Big Huge Lab.